
Layered bangs in 2026 range from barely-there wisps to deliberately shattered shags, and the deciding factor is how much styling time you will actually spend each morning. The catch is that most of these cuts grow out unevenly if the initial angle is wrong; dry cutting saves the shape, wet cutting risks an inch of surprise shrinkage. Feathered front layers, for instance, rely on a diagonal that starts at the cheekbone and tapers away, a line that collapses into bulk if the ends are not thinned properly.
1. Long Feathered Front Layers

Long feathered front layers sit right at that sweet spot between a full fringe and grown-out hair you keep tucking behind your ear. The cut keeps the bang area longer, usually falling somewhere between cheekbone and jaw, with the ends thinned so they taper away from the face rather than hanging in a blunt line. That feathering is what saves the style from feeling heavy; the layers create movement so the hair reads as texture, not bulk, and it works on straight, wavy, or hair with a loose curl pattern.
The shape matters more than the length. What you want is a soft diagonal that starts closer to the face at the front and gradually moves away, which is why dry cutting is the safer move here. Wet hair stretches, sometimes by a noticeable margin, and a cut that looked conservative at the shampoo bowl can land an inch shorter once it dries. I have watched stylists comb the section forward, establish the longest point they are willing to keep, and work inward from there. You can always take more off; you cannot put it back.
2. Layers and Eyebrow-Grazing Bangs

Brow-skimming bangs sit at a length that feels precise, not forgiving. The line has to land right at the eyebrow, or the whole effect shifts from eye-opening to just short. Subtle layering through the crown and around the face keeps the cut from looking like a blunt helmet; the layers break up the weight so the bangs read as light rather than heavy.
This pairing suits oval and longer faces because the horizontal bang line adds width right where those shapes run narrow. Rounder faces, in my view, tend to fight against that same horizontal stop. Trim every 4–6 weeks if you want to keep the eyebrow-grazing length in its zone. Let it creep toward the lashes and the openness disappears; let it retreat toward the forehead and you are suddenly in a different style entirely. The maintenance is the style.
3. Choppy Shag with Bangs

A choppy shag with bangs lives or dies by how the ends are cut. Vertical snipping into the tips, rather than a clean horizontal line, leaves each layer with a piecey, lived-in shape that separates instead of stacking. The irregular fringe plays against the disconnected layers so nothing reads too uniform.
For fine hair, those choppy ends add volume by creating pockets of air between strands. For thick hair, the same technique removes bulk without sacrificing the overall silhouette. Ask your stylist to keep the layering soft around the face for a natural finish, with softer layering through the back so the movement stays consistent from every angle. The result reads rock-and-roll without looking like costume hair.
4. Side-Parted Feathered Cut

The side-parted feathered cut works because the bangs sweep across the forehead and feather back in one continuous motion, with soft layers that follow the part line all the way down. That asymmetry pulls the eye sideways and upward, which creates the illusion of length on a round face where width is usually the problem.
Training the feathered direction takes a round brush and blow-dryer used together while the hair is still damp. I wrap the bangs around the brush, set the dryer on medium heat, and roll outward from the part so the ends flick back rather than fall forward. Two or three rounds of this and the hair starts to hold the shape on its own. The round brush matters more than the dryer brand; a two-inch barrel gives enough tension without crimping the layers.
5. Feathered Cut with Razored Bangs

The razor is what separates a feathered cut from a blunt one. Where shears leave a hard edge, a razor thins and softens the bangs into wispy, airy pieces that melt into the layered sides instead of sitting on top of them. That blend is the whole point of this style.
Medium to thick hair handles razoring best. Fine hair can end up looking sparse where the blade removes weight, so the density matters more than the length. Ask your stylist to work the razor at an angle, not straight across, so the ends taper rather than shred.
The maintenance is lighter than it looks. Because the edges are already broken up, the grow-out stage is forgiving; you are not racing back to the salon the moment the bangs hit your eyelashes. That ease is what makes this cut a practical choice if you want face-framing layers without the styling hassle.
6. Style with V-cut Layers

A sharp V-cut in the back changes everything about how hair moves while the front stays controlled. The back layers drop to a defined point, sometimes dramatic enough to read as a shape from behind, while bangs stay shorter and pulled forward to frame the face. That contrast between the rear drama and the restrained front is what keeps the silhouette wearable rather than theatrical.
This cut solves the problem of long hair that has gone flat and heavy. You keep the length, but the V-shape gives it architecture. The shorter crown layers lift, and the descending back creates natural swing that a blunt hemline never achieves.
Blowouts are where this style earns its keep. The V-cut was built for movement under a dryer, and the layers separate cleanly when you round-brush them. A thermal protectant before you start keeps the ends from frying, since those back points are the oldest, most fragile hair on your head. Without that prep, the shape goes stringy instead of flowing.
Bangs here need enough length to meet the front layers without a stair-step gap. Too short and they hover; too long and they fight the face frame. The blend matters because the eye travels from that controlled front to the open back, and any break in between kills the line.
7. Cut with Face-Framing Layers

Face-framing layers that start at the chin or cheekbone and curve inward do the heavy lifting of highlighting bone structure without the stiffness of a solid block of hair. The bangs continue that same framing line so the eye travels in one continuous arc rather than stopping at a hard edge. A side-swept frame fringe leaves just enough forehead visible to break up the area without exposing all of it, which makes the forehead read smaller than it is.
Jennifer Lopez has used this technique for years, keeping layers at cheekbone level that sweep forward and blend into bangs with the same inward curve. The styling is minimal: blow-dry the bangs forward for a bolder line, or backward for a feathered effect similar to what Selena Gomez has worn. Either way, the cut itself carries most of the shape. Razored ends keep the maintenance low and the volume natural, which matters if you want the style to hold up between washes without restyling from scratch.
8. Haircut with Wispy Bangs

Wispy bangs sit so lightly on the forehead that the skin shows through in places, almost like a veil rather than a wall. That transparency comes from cutting the hair into ultra-fine, layered pieces rather than a solid blunt line, which is exactly why they grow out without the awkward phase that thicker bangs hit around week three. The soft edge means regrowth simply extends what is already there; there is no harsh line creeping downward to announce it is time for a trim.
The commitment level stays low compared to heavier styles. Short blunt bangs demand regular maintenance and read as a deliberate statement, but wispy pieces can be pushed aside, clipped back, or left to blend into longer layers without much fight. Jennifer Lopez and Halle Berry have both used longer, layered bangs this way, sweeping them away when the mood shifts. The difference with true wispy bangs is that the pieces start shorter and more scattered, so even pinned back they look intentional rather than like grown-out leftovers.
Stylists typically cut these with a point technique, snipping vertically into the ends so no two pieces land at exactly the same spot. The result catches light differently across the forehead, creating movement that heavier bangs cannot match. For women building a wardrobe of pieces that work across occasions, this matters: the same haircut reads polished enough for video calls and relaxed enough for weekend errands without restyling.
9. Wispy Bangs for Fine Hair
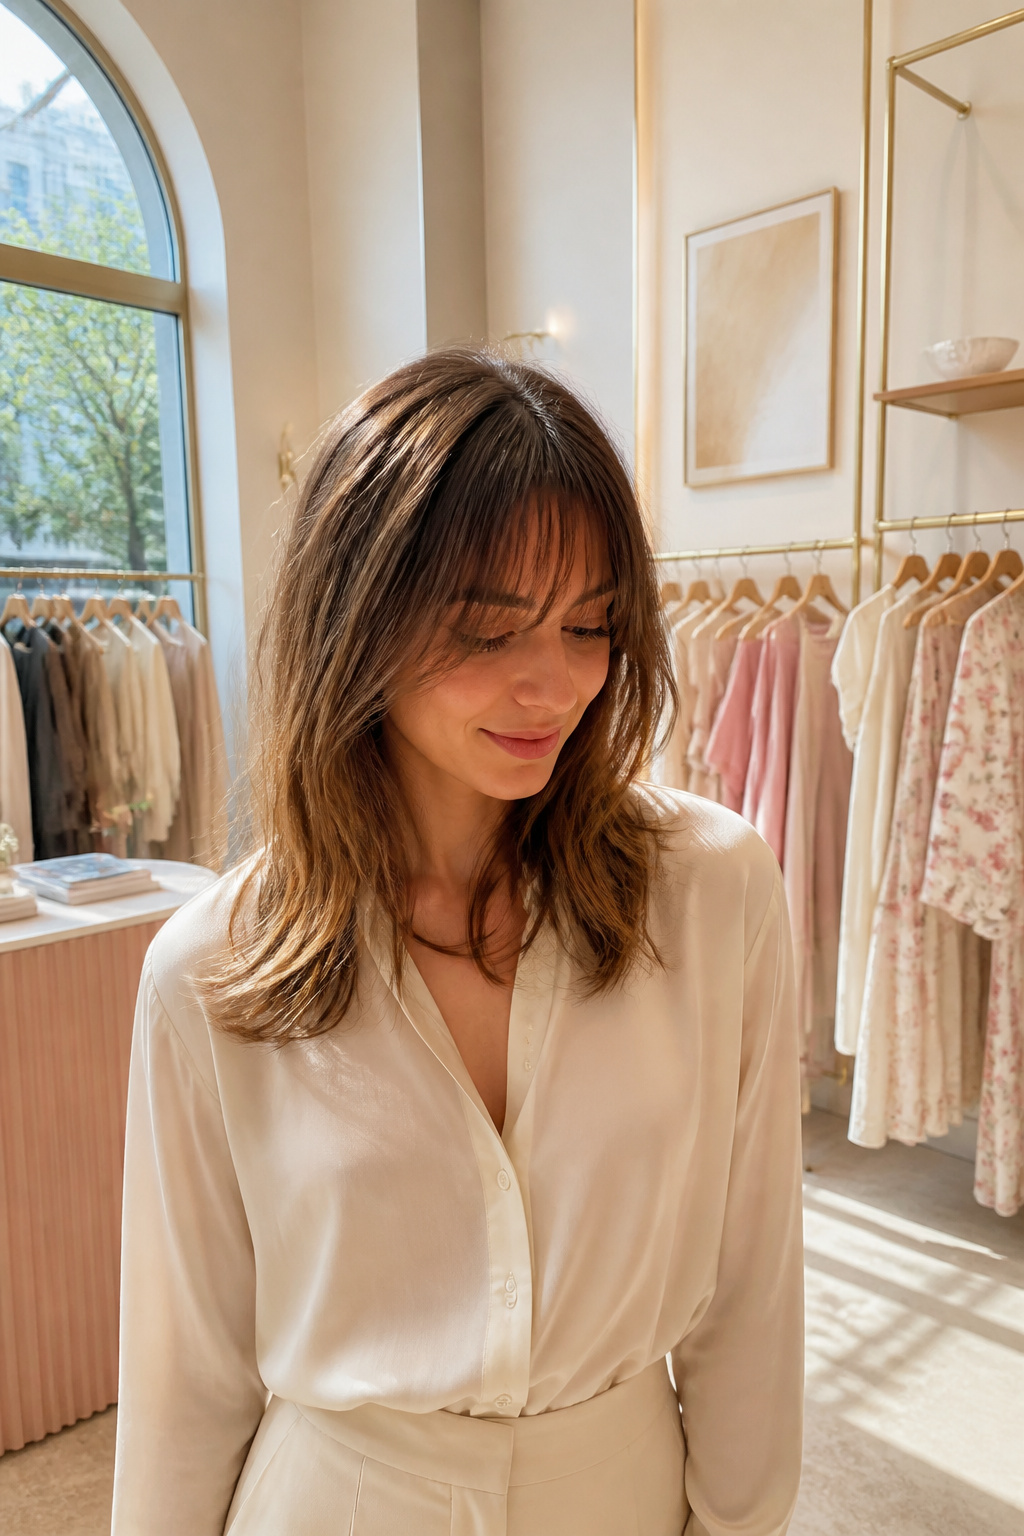
Fine hair tends to fall flat against the forehead, so keeping wispy bangs shorter at the root is what maintains lift instead of letting them collapse into a sheer curtain. The first time I saw this done well, the stylist had cut the bangs just at eyebrow level and layered the crown in soft, staggered pieces that started about two inches back from the hairline. That layering is where the volume comes from; fine hair lacks the natural density to hold shape on its own, so those upper layers do the structural work of creating movement and the suggestion of thickness.
Styling matters as much as the cut. Volumizing mousse is the product that makes this style hold through the day, applied to damp hair at the roots before blow-drying with a round brush directed upward. The mousse gives flexible hold without the stiffness that can make fine hair look thinner, and the glossy finish lasts well into the second day even in humid conditions. Skip the mousse and the bangs go limp by noon; use too much and the layers separate and look wispy in the wrong way.
10. Layered A-Silhouette Cut
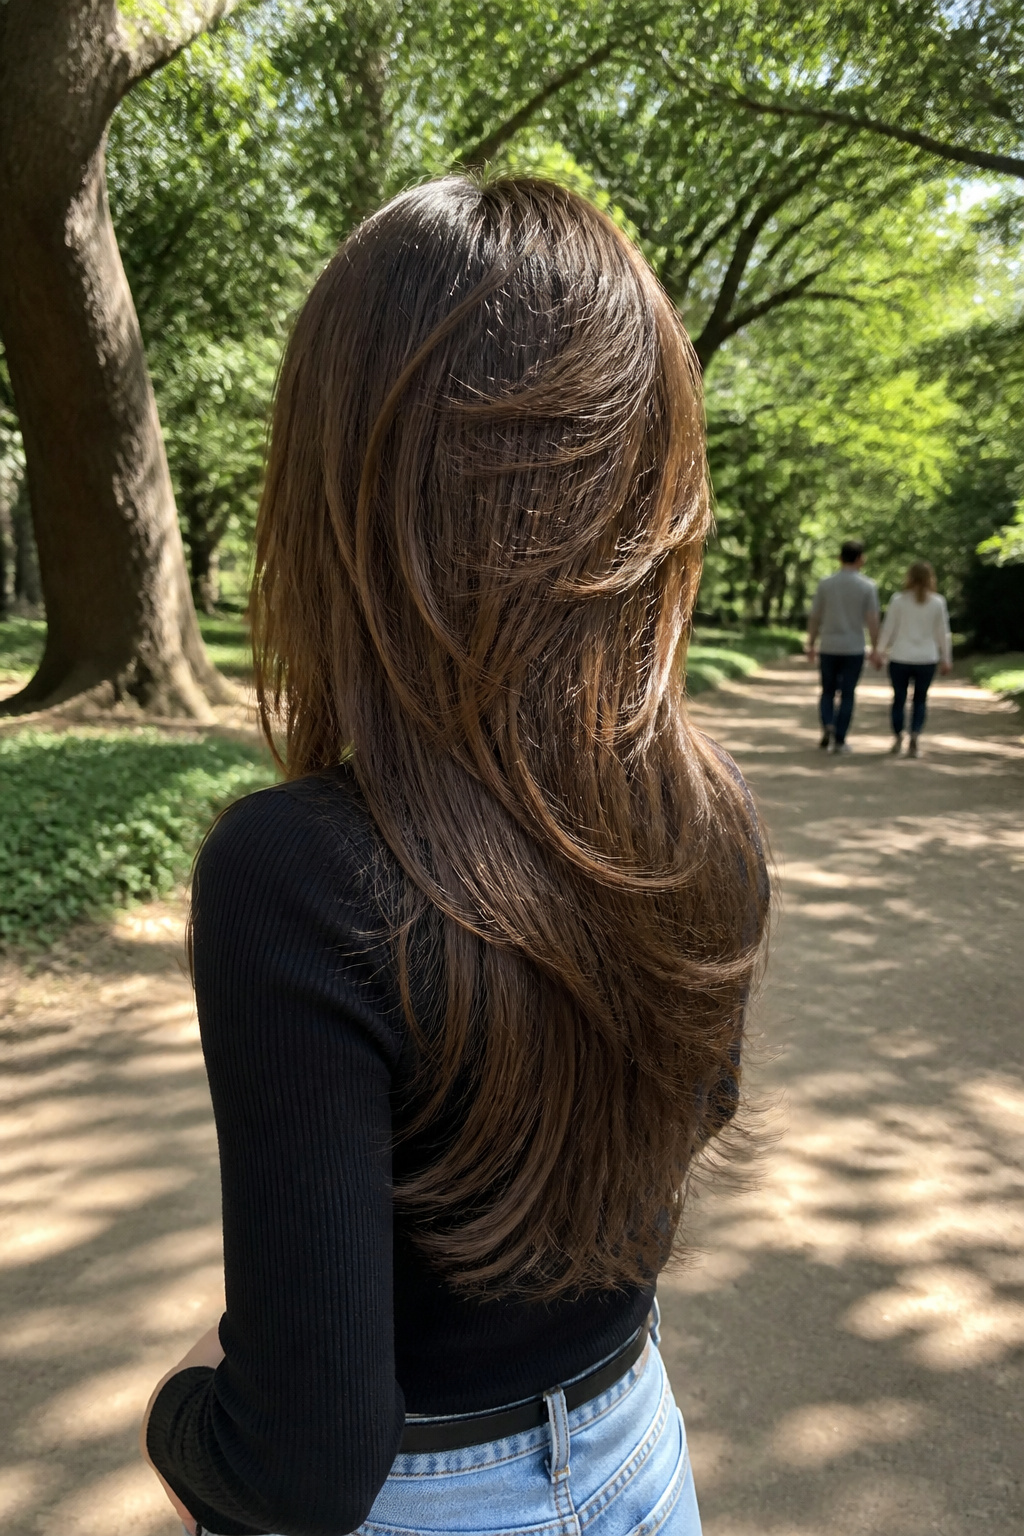
The A-silhouette builds its shape from back to front, shorter at the crown and angling longer as it reaches the face, with layered bangs that carry that same forward sweep rather than sitting blunt across the forehead. The layers stack in a deliberate directional flow, each one feeding weight and movement toward the front rather than bouncing around at random. I have seen this cut go wrong when a stylist treats those face-framing pieces as an afterthought; they need to be drawn from the same parting and cut at the same angle as the perimeter, or the whole shape collapses into two unrelated haircuts. Straight to slightly wavy hair carries this best. The line relies on clean fall and predictable weight, and anything too curly fights the geometry and turns the intended sweep into a rounded bubble around the face.
11. Flippy Layers Haircut

The flippy layers cut builds its shape around one trick: ends that kick outward instead of curling under. That outward flick reads as movement even when the hair is barely past chin length, and it pairs naturally with bangs that can either flip up at the brow or press flat depending on how you aim the dryer.
What sold me on trying this style was watching how it cooperates with growth patterns rather than fighting them. My own bangs grow with a slight left bias, and brushing them opposite that direction while drying gives them volume at the root that stays put without backcombing or heavy product. The rest of the layers follow the same logic: cut to encourage the natural bend, not to force a new one.
The retro reference is real but not costume-y. The silhouette echoes early 1960s cuts because the shape is similar, but the execution now uses point-cutting or slide-cutting to soften the line so it does not read as stiff. Ask for ends that are thinned slightly; thick blunt ends flip too aggressively and the look becomes helmet-like by week three.
Styling takes a round brush and a dryer with a concentrator nozzle. Work the bangs first, brushing against growth while the heat is on, then switch to cool air for ten seconds before releasing. The layers need only a quick pass with the brush turning outward at the ends. No curling iron required, which matters on mornings when you have five minutes.
12. Long Bangs for Thick Hair

Thick hair can turn bangs into a solid block that sits too heavy against the face. The fix is keeping them longer than the usual eyebrow-grazing length, which lets the weight spread out instead of collecting in one dense line. Layers worked through the bangs themselves and continuing into the surrounding hair remove bulk while still leaving enough visual presence to frame the face properly.
A texturizing spray becomes the finishing tool here. Mist it through dry bangs and separate the layers with your fingers so each one reads individually rather than merging back together. Spray at the roots, then work outward to avoid overloading the ends, which on thick hair can start to look stringy instead of piece-y. The goal is definition, not grit; you want the layers to catch light differently, not feel product-heavy.
13. Shattered Shag Haircut

The shattered shag takes the 1970s revival to its most deliberate extreme: jagged, irregular layers cut at varying lengths so the bangs look broken on purpose, not grown-out by accident. I first noticed this style resurfacing in salon portfolios where the before-and-after captions kept stressing "intentional disintegration," which tells you how hard stylists work to make chaos look controlled.
Curly hair carries the shattered effect surprisingly well; the uneven lengths catch light differently and the ragged perimeter keeps a round curl pattern from turning into a triangle. On straight textures, the same cut reads more graphic and editorial, almost like a punk reference softened by feathering at the ends. The bangs themselves are typically the shortest point, sometimes cropped above the brow line while side pieces trail toward the jaw, so you get three distinct lengths framing the face at once.
What convinced me this style works for daily wear, not just magazine shoots, was seeing how the irregular layers air-dry. Because nothing is supposed to line up, humidity or slept-on texture actually feeds the look rather than ruining it. The maintenance is moderate: every eight to ten weeks the shortest pieces need refreshing, but the longer shattered sections can grow for months without destroying the silhouette.
14. Cut with Delicate Face-Framing

The softest entry into bangs starts at the cheekbone and barely moves from there. Layers this slight can be pushed back behind the ears by noon or brought forward for a dinner out, and the shift takes thirty seconds, not a styling session. The bangs themselves match that same minimal weight, cut to graze rather than announce themselves.
What sold me on this combination, reading through dozens of salon accounts, is how deliberately it avoids the grow-out trap. Because the shortest point sits at the cheekbone rather than the forehead, the awkward phase most people fear never really arrives. Jennifer Lopez and Halle Berry have both used versions of this to test bangs without the full commitment; the length lets them sweep away when the mood shifts. Blow-drying forward gives a bolder frame, while backward drying feathers the edge into the layer, a trick stylists note works on most hair textures without heavy product.
For the bangs-curious who panic after the first snip, this is the cut to request: face-framing that starts subtle and stays that way.
15. Cascade with Parted Bangs

The cascade lives in the movement, not the volume. Long layers waterfall past the shoulders while the bangs split at center or just off, opening the face without the full 1960s Bardot pouf that made curtain bangs famous. Brigitte Bardot wore that shape loud and high; this 2026 version keeps the part but lets the hair fall quieter, more liquid.
What convinced me, looking through dozens of these cuts, is how the parted bangs balance a high forehead without the blunt commitment of straight-across fringe. The layers do the heavy lifting past the cheekbone, so the bangs can stay wispy, barely there, still functional. They work on curls too, which surprised me, since I assumed the split would fight the coil. The bangs stay long enough, past the eyes when relaxed, to weigh themselves down and behave.
If your face runs square, this is worth trying. The center opening draws the eye vertically while the side pieces soften the jaw. Ask for the part to sit where your natural growth wants it, then have the stylist cut the bangs dry so you see the true length before they spring up.
16. Style with Peekaboo Bangs

Peekaboo bangs work best when your stylist keeps them long enough to start around chin length, so you have the length to tuck them behind your ear or let them fall forward across your forehead depending on the day. The whole point is that shift between hidden and revealed, a small change that reads as a completely different mood without a salon visit.
Hair grows about a half inch every month, which means the awkward middle phase of growing out shorter bangs lasts longer than most of us plan for. Peekaboo length sidesteps that entirely. You are not waiting for your fringe to catch up to the rest of your hair; you are wearing it intentionally long from the start, then deciding in the morning whether you want the forehead covered or not.
The tuck-behind move also helps if your hair is thick, since the extra length distributes the weight instead of letting bangs pouf straight out. A lightweight scalp serum keeps the strands from drying out at the ends while they sit at that length, especially if you are flipping them back and forth often enough to create friction.
17. Wispy Curtain Fringe Hairstyle

The classic curtain bang has softened into something lighter for 2026. Wispy curtain fringe trades the bold, blunt edge for ends that are finer and more diffused, almost disappearing into the rest of the hair rather than sitting as a solid block across the forehead. This iteration suits finer hair textures especially well, where a heavier fringe can look like a separate piece rather than part of the whole style.
The cut matters here. Ask your stylist to work at an angle from the middle parting rather than straight across. That angled sectioning is what lets the fringe move properly, falling forward when you want coverage and blending back when you push it aside. Without that angle, the ends hang static and the wispy effect reads as grown-out rather than intentional.
Softer features benefit most from this diffused edge. Where a blunt curtain bang can dominate a face with delicate bone structure, these lighter ends create a frame without declaring themselves. The maintenance is friendlier too; the diffused line forgives a week or two of growth in a way a precise blunt edge never will.
18. Graduated Layers with Bangs

Hair that falls flat in a single-length cut often lacks the internal architecture to hold its shape, which is exactly where graduated layers with bangs rebuild the problem from the inside out. The shortest pieces sit at the crown and the front hairline, then each subsequent layer drops longer so the weight stacks in a curve rather than hanging straight. I noticed this shape first on a client whose fine hair always went limp by noon; the graduation gave her enough built-in lift at the roots that she stopped reaching for teasing combs entirely.
The bangs mirror the same logic, starting shortest at the forehead and feathering back into the longer crown layers so there is no harsh line where fringe meets the rest of the cut. Shorter layers at the top add the height, while the longer ones below keep the silhouette from turning into a triangle. A thermal protectant spray before any heat work helps the graduated edges hold their curve, and a light texturizing spray at the ends keeps the movement from collapsing by midday. Straight to curly textures can wear this, though the graduation needs adjusting: tighter curls shrink the top layers visibly, so the stylist should cut them longer than they look wet.
19. Hairdo with Thin Blended Bangs

Thin blended bangs live or die by the transition zone, that inch or two where fringe meets the first layer beside your face. Vertical cutting into the ends, snipping straight up with shears rather than across, is what erases the hard line that makes cheap bangs look like a stuck-on piece. The hair tapers so gradually that you cannot find the exact spot where bang stops and layer begins, which matters more than the length you choose.
I have watched stylists spend ten minutes on this detail alone, combing the section forward, then angling it back, feathering the edge until the merge holds from every viewpoint. The technique works on most textures, though very coarse hair may need the ends thinned with texturizing shears first so the vertical cuts do not bulk up. Ask for the blend to sit at cheekbone level or slightly below; higher placement turns the seamless edge into a wispy curtain that reads as grown-out rather than intentional.
Maintenance is the catch. Vertical softening grows out faster than a blunt bang because the longest pieces reach down into your face-framing layers. Plan on a trim every four to five weeks if you want the boundary to stay invisible, or let it evolve into longer curtain fringe between appointments.
20. Thick Hair with Sweeping Bangs

Thick hair is the prerequisite here. A sweeping bang that crosses the forehead in one continuous, heavy line needs genuine density underneath to keep from collapsing into wispy pieces. The layers do the opposite work: they live beneath the bang and behind it, removing weight so the shape stays light and moving rather than helmet-like.
Zooey Deschanel built her entire signature look on this exact trade. Her bangs read as one solid curtain because the hair behind them was layered to release bulk. Without those internal layers, the same cut would sit like a blunt bowl.
The shape works best when the sweep starts deep, almost at the temple, and travels at a slight diagonal rather than a straight horizontal. Round-brushing with a large barrel while the hair is still warm from the dryer sets the curve without forcing it into a curl. A flat iron will kill the movement; the round brush is the tool that matters.
The Bardot revival follows the same principle, though it pushes the volume higher. Both looks fail on hair that is fine or thinned, no matter how skilled the cut. The density is not negotiable.
21. Long Money-Piece Bangs

The money-piece technique lives or dies by contrast, and pairing it with longer bangs that start at the cheekbones gives that contrast room to work. Your stylist lightens the front framing pieces dramatically, almost to a ribbon, while the rest of the hair stays closer to its natural depth. The eye goes straight to the face; the bangs do the framing without needing additional layers throughout, though they certainly do not hurt if you want movement through the ends.
I have watched this go wrong when the lightened section creeps too wide, swallowing the jawline instead of pointing to it. Ask for the money-piece to stay narrow, maybe an inch and a half back from the hairline at most, and keep the bangs long enough to tuck or sweep. The shorter you go, the more the highlight reads as a fringe color rather than a frame. With thick hair especially, those long curtain bangs keep the look from turning heavy; the front layers can be softly highlighted to pull the whole thing together, but the drama is in that single bright path running alongside the face.
22. Layers with Soft Curls

Curly hair fights a layered cut when the layers are cut to a length the curls refuse to reach. The fix is cutting curly hair dry, since wet curls stretch up to 45% longer and spring back unpredictably once they dry. A dry cut lets the stylist see exactly where each coil lands.
For layered bangs on natural curls, the interior layers need a concave shape, tapering the ends so the weight does not bottom out into a triangle. The bangs themselves should be left long enough to match the curl’s spring factor; what reads as eyebrow-grazing when wet might shrink to half-forehead length by morning. I watched this go wrong once on a friend who asked for a trim after a shower: her "soft curtain" dried into a blunt shelf that sat an inch above her brows. The stylist had to take the rest up to match.
If your curl pattern is looser, ask for the layers to fall at the points where your hair naturally clumps. Tighter coils can handle shorter interior layering without looking piecey. The bangs and the face-framing layers should be cut in the same session, dry, with the stylist shaking the hair between snips to see how it moves.
23. Ombre-ed Shag Haircut

The ombre-ed shag pulls the color story all the way through the cut, not just the length. Dark roots melt into lighter ends, and because the shag’s layers are cut to open up the interior, you see that shift at three or four different depths instead of one flat sweep. The bangs can ride the same gradient or act as a foil; a slightly darker fringe against pale ends frames the face without the washed-out look that all-over lightening sometimes gives.
Plan on a tone refresh every eight to ten weeks if you want the line between levels to stay deliberate. The grow-out on a shag is forgiving, but the color isn’t; once the root shadow creeps past an inch, the whole point of the ombre starts to muddy. At-home glosses help between salon visits, though they won’t shift the level, just the clarity.
24. Textured Wavy Haircut

Point-cutting or razoring changes everything for wavy hair. The technique slices into the ends rather than cutting straight across, so the layers and bangs separate into pieces that move on their own. Your wave pattern becomes the architecture of the style, not something you fight flat with an iron every morning.
The bangs need to stay on the thinner side. Heavy, blunt bangs sit like a shelf and fight the volume underneath; lighter ends let the wave push through and blend the fringe into the rest of the cut. Ask your stylist to work dry, watching how each section springs up, so the shape accounts for what your hair does naturally.
For styling, sea salt spray is the ally that makes the texture intentional. Spray it through damp hair, scrunch, and let it air-dry or diffuse. The salt crystallizes on the razored ends and keeps the separation sharp without adding stiffness. Skip creams or oils here; they reunite the pieces you just paid to break apart and the whole cut collapses into one heavy wave.
25. Shaggy Layers with Long Bangs

The shaggy layers with long bangs that blur together in length work best when the cut is irregular and hand-cut rather than uniform. Longer curtain bangs parted down the middle blend seamlessly with the rest of the waves, with no need to use tons of styling products. The undone, grown-out look comes alive with some natural oil and less frequent washing; skip the daily shampoo and let your scalp’s own moisture give the texture its grip. Shoulder-length hair carries this well, and if your hair is thinner, the layers add the texture and style that bulk alone cannot provide. Stylists can shift volume to where it is better suited, adding dimension and depth that creates movement in the locks. The look nurtures natural textures, adding body without forcing a polished finish.
26. Thick Side-Swept Bangs Style
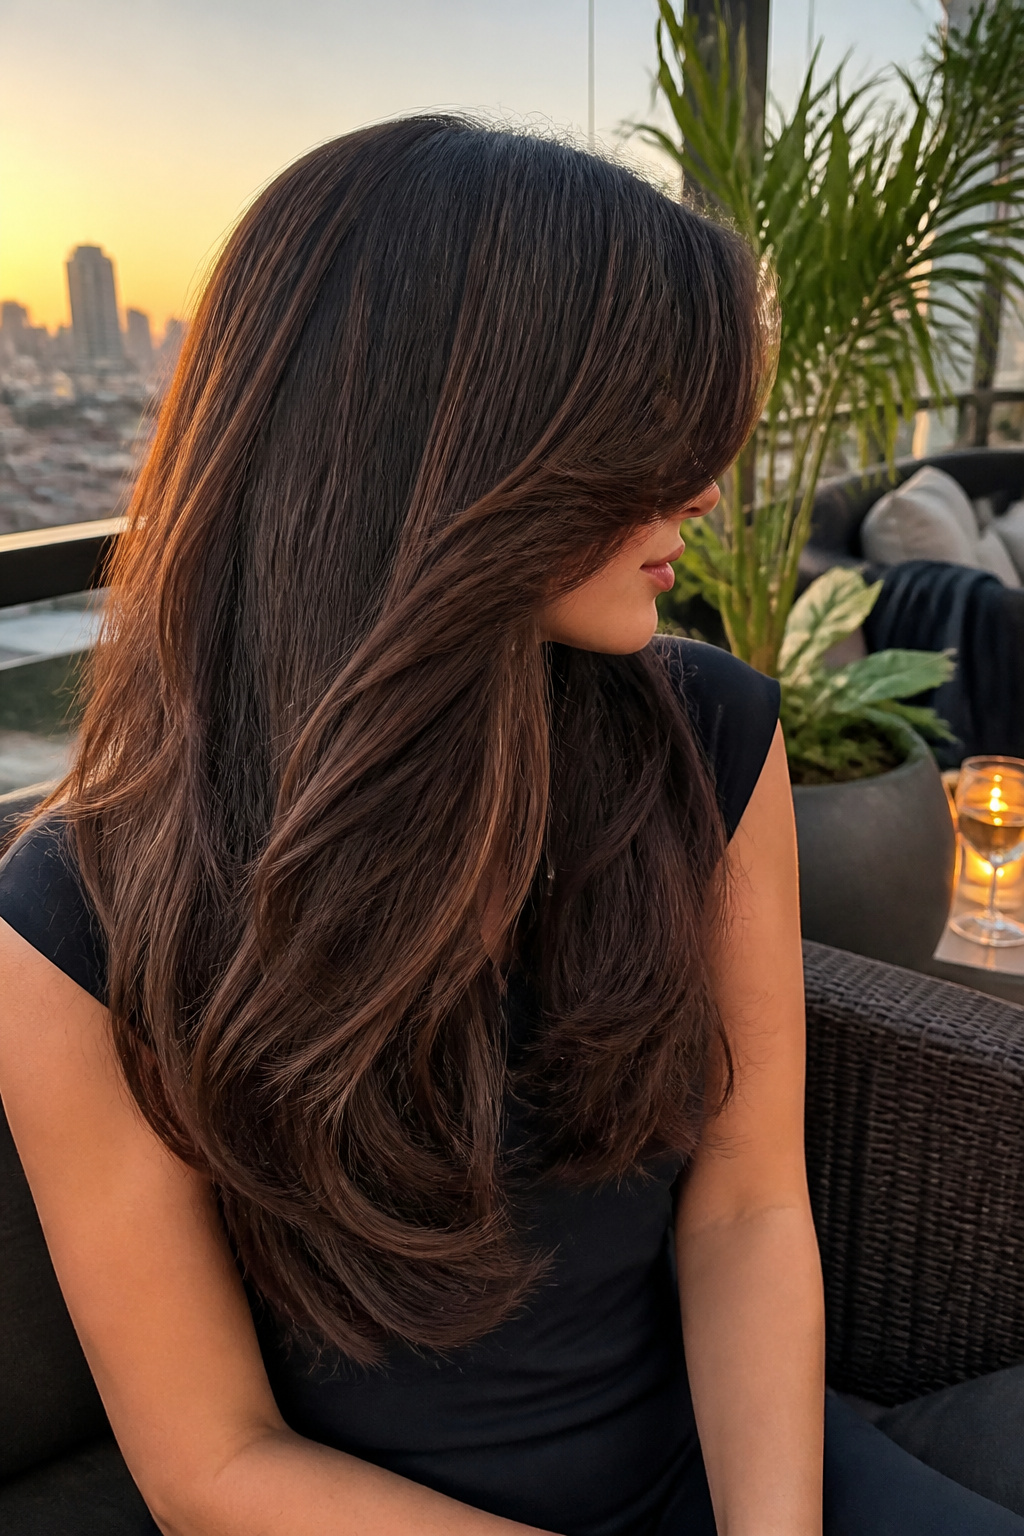
A substantial side-swept bang only works if it has enough weight to stay put through a full day. The trick is in the layering underneath: interior layers remove bulk behind the curtain so the surface sweep keeps its density without fighting the rest of the hair. I learned this the hard way after a cut that left the bang section too thick; the sweep kept collapsing back to center by noon.
If your hair naturally pulls forward, a flat iron sets the side direction more reliably than a round brush alone. Clamp at the root, draw the iron in a diagonal line toward your temple, and let the section cool pinned to the side before you shake it out. That heat training holds through humidity better than product alone.
For fine hair that still resists, textured layers starting from mid-lengths reduce crown weight so the fringe isn’t competing for volume. The bangs should skim the eyebrow at their longest point and taper shorter toward the back of the section; anything longer and the weight shifts the whole shape forward again.
27. Choppy Cut with Swoopy Bangs

Sharp, angular layers underneath paired with bangs that arc in one continuous curve across the forehead create the tension that makes this cut work. The choppy texture below keeps the shape from feeling too polished or retro, while the swoop above draws the eye upward and opens the face.
Training the curve takes a round brush and a specific blow-dry habit. Work the brush from the root at a diagonal, rolling the bangs across the forehead as you dry, so the hair sets into that single dramatic sweep rather than breaking into pieces. A medium-barrel brush, about two inches, gives enough tension without forcing too tight a curl. The layers beneath air-dry or diffuse messily; the contrast is the whole point.
This style asks for some length in the bangs, enough to travel from a deep side part to the opposite temple without falling short. Too short and the swoop becomes a flip; too long and it obscures the eyes. The choppy layers below need refreshing every eight to ten weeks before they grow out and lose their bite against the smoother line above.
28. Straight Layers with Feathering

Straight layers with feathering sit in that narrow space between sharp and soft, and getting the balance right matters more than the length you start with. The cut itself is blunt: a precision line that reads as clean from a distance. Only the last quarter inch is feathered, lightened with point cutting so the edge moves instead of folding under like a book page. Fine to medium hair that falls flat on its own is where this pays off, because the feathering introduces movement without asking the strand to do work it can’t manage.
The bangs follow the same logic. The base stays straight and heavy enough to hold a part, but the perimeter is thinned so it breaks into pieces rather than hanging as a solid curtain. I watched a stylist work this out on a client with hair that had the density of cotton thread: too much feathering and the bangs disappear, too little and the whole look turns helmet-stiff. She settled on three passes with thinning shears, checking after each. The result held shape through a commute but still separated when she pushed it back with her hand.
Maintenance is the trade. The blunt base grows out visibly, and the feathered ends need refreshing every six to eight weeks or they go ragged. If your calendar can’t handle that rhythm, this is probably not your cut.
29. Rounded Feathered Layers Haircut

Rounded feathered layers curve under in a soft, continuous arc rather than falling straight or flicking outward. The bangs feather into that same curve instead of cutting across it, so the line stays unbroken from forehead to ends. That uninterrupted roundness does the most flattering work on square jawlines, where the curve softens the angles rather than boxing them in further. For thin hair, the shape adds perceived fullness because the rounded silhouette reads as volume even when the strands themselves are fine. The layers give movement, and the bangs can sweep to the side and be customized to fit your face shape. With proper styling, this look holds its shape; light hairspray gives a polished finish that lasts.
30. Subtle Layers and Bangs Combo

Subtle layering sits almost flush with the rest of the hair, so the eye reads it as nearly one length until you move. The bangs follow the same rule: straight across or slightly curved, but never thick enough to demand their own styling routine. What convinced me, looking through dozens of these cuts, is that the less obvious the layers, the longer you can stretch between salon visits. A heavy fringe grows out into a problem in six weeks; a whisper-thin one simply becomes a slightly longer whisper.
The cut works best when the shortest layer falls no higher than the chin, letting the ends blend without visible steps. Your stylist should point-cut rather than slice, removing weight while keeping the line clean. Bangs should be cut dry, since hair this restrained shows every millimeter of shrinkage.
This is the style for someone who wants the idea of movement without committing to the upkeep. Wash, air dry or rough-dry with your hands, and the shape holds. No round brush required, no morning battle with cowlicks. The trade is volume: you will not get the lift of a shag or the drama of a heavy fringe. What you get is a haircut that looks intentional on day one and still looks intentional on day forty-five.
31. Curly Shag with Parted Bangs

A curly shag with parted bangs needs a stylist who actually works with curl patterns, not just someone who says they do. The layers are cut to build roundness through the crown and sides, which keeps curly hair from falling into that stretched-out vertical line a standard shag tends to give. Parting the bangs lets each curl spring in its natural direction instead of forcing them to meet in the middle, and that part can shift depending on where your curls clump best. The cut relies on interior layers, tapered with a concave shape, to remove bulk without losing the curl’s own pattern. Ask specifically about experience with curly textures; a shag on straight hair and a shag on curls are different requests entirely, and the wrong approach leaves you with a triangle silhouette rather than the shape you’re after.
32. Big Curls with Straight Bangs

Big curls with straight bangs live on deliberate contradiction. The volume sits everywhere except the fringe, where a blown or ironed panel cuts flat against the forehead. That graphic line is what keeps the style from reading as costume; it anchors the shape so the curls don’t swallow the face.
The commitment is real, though. Two entirely different styling routines have to coexist. Curls need diffusing, creams, maybe finger-coiling while wet. Bangs demand a round brush or a flat iron, plus a smoothing product that won’t migrate down and deflate the ringlets. On mornings when one side cooperates and the other doesn’t, the mismatch is glaring.
I’ve watched friends abandon this look not because the result was bad, but because the time math stopped working. If you’re already stretching wash days for your curl pattern, adding a daily bang refresh is a hard sell. The ones who stick with it tend to schedule their washes around events, not the calendar, and keep a mini straightener at the office for fringe emergencies.
For women with naturally straight hair, the reverse problem applies: the curls are the project, not the bangs. Either way, this pairing rewards planning more than spontaneity.
33. Thin Center-Parted Bangs Style

Fine hair has a way of disappearing under a heavy fringe, and that is where thin center-parted bangs earn their place. Splitting the hair dead center leaves two narrow curtains that frame the face without demanding volume you do not have. The symmetry of the part draws the eye straight to the center of the face, which tends to soften the jaw and widen the eyes in a way that feels deliberate rather than accidental.
I have watched this style fall apart when the part wanders even a quarter inch off true. The unevenness reads as a mistake on sparse hair, whereas on thick bangs it might pass for texture. A rattail comb and a handheld mirror, checked from straight on and in profile, fixes this before the scissors come out. The cut itself should land between the lash line and the top of the cheekbone; shorter than that and the gaps between strands turn into visible scalp, longer and the curtains lose their lightness and start to look like failed full bangs.
This is the option I would steer toward for anyone whose features feel overwhelmed by solid blocks of hair, or whose strands simply refuse to bunch together with any density. The maintenance is minimal, a trim every five to six weeks, though the center part itself needs reasserting each morning with a fine-tooth comb while the hair is still cool from the dryer.
34. Messy Lob with Choppy Ends

Chopped ends on a long bob read as intentional only when the bangs share the same irregular rhythm. I learned that the hard way after a cut where my lob looked editorial and my fringe looked like a mistake, two different moods on one head. The fix was matching the disruption: texturizing spray on dry bangs, worked in at the roots, then a piece-y product through the ends so the whole shape carries the same controlled chaos. SHAPE Pliable Paste does the holding work here, warmed in the palms and applied in sections rather than raked through, which keeps the separation instead of turning it into frizz. Whether the color runs beachy blonde or deep chocolate brown, the effect is the same: a texture that looks slept-on but stays where you put it.
35. Texturized Locks with Side Bangs

Heavily texturized hair with bangs swept to one side lives or dies by the point cut. The snip at an angle, tip to tip, leaves each strand free to move on its own. That separation is what catches light differently from every angle and keeps the style from reading as a solid block.
The texture dominates here, start to finish. Your stylist should chip into the layers throughout, not just the ends, so the volume builds in pieces rather than pooling in one zone. I have watched this go wrong when someone with already fragile hair asked for the full treatment. Over-texturizing on compromised strands turns the ends wispy in the wrong way, the kind that frizzes instead of flows. This cut suits stronger, healthier hair best, the kind that can survive the thinning shears and still hold body.
For styling, a texturizing spray before any heat work adds the grip that keeps the separation visible past noon. Finish with a light hairspray, something that holds without the helmet feel, so the point-cut pieces still shift when you turn your head.
36. Wavy Style with Bottleneck Bangs

Bottleneck bangs started showing up everywhere on my feed around late 2024, and the shape is more specific than the name suggests. The sectioning matters: the bangs stay narrow at the top, then flare outward toward the cheekbone exactly where a glass bottle widens. Paired with waves that echo that same flare, the silhouette reads as intentional rather than grown-out.
The commitment level sits lower than blunt bangs. Shorter strands stay on the forehead to frame the face, but the length works with bobby pins or a side push when you need them gone. That 1970s sensibility threads through without looking costume-heavy.
For styling, a texturizing spray before curling adds body the waves need to hold their shape. Light hairspray finishes without the helmet effect. The style dresses up or stays casual, but the sectioning at the cut stage determines whether the bottleneck shape actually happens. Ask for the flare point by your cheekbone; vague requests tend to land you somewhere between curtain bangs and grown-out layers.
37. Haircut with Thick Bardot Bangs
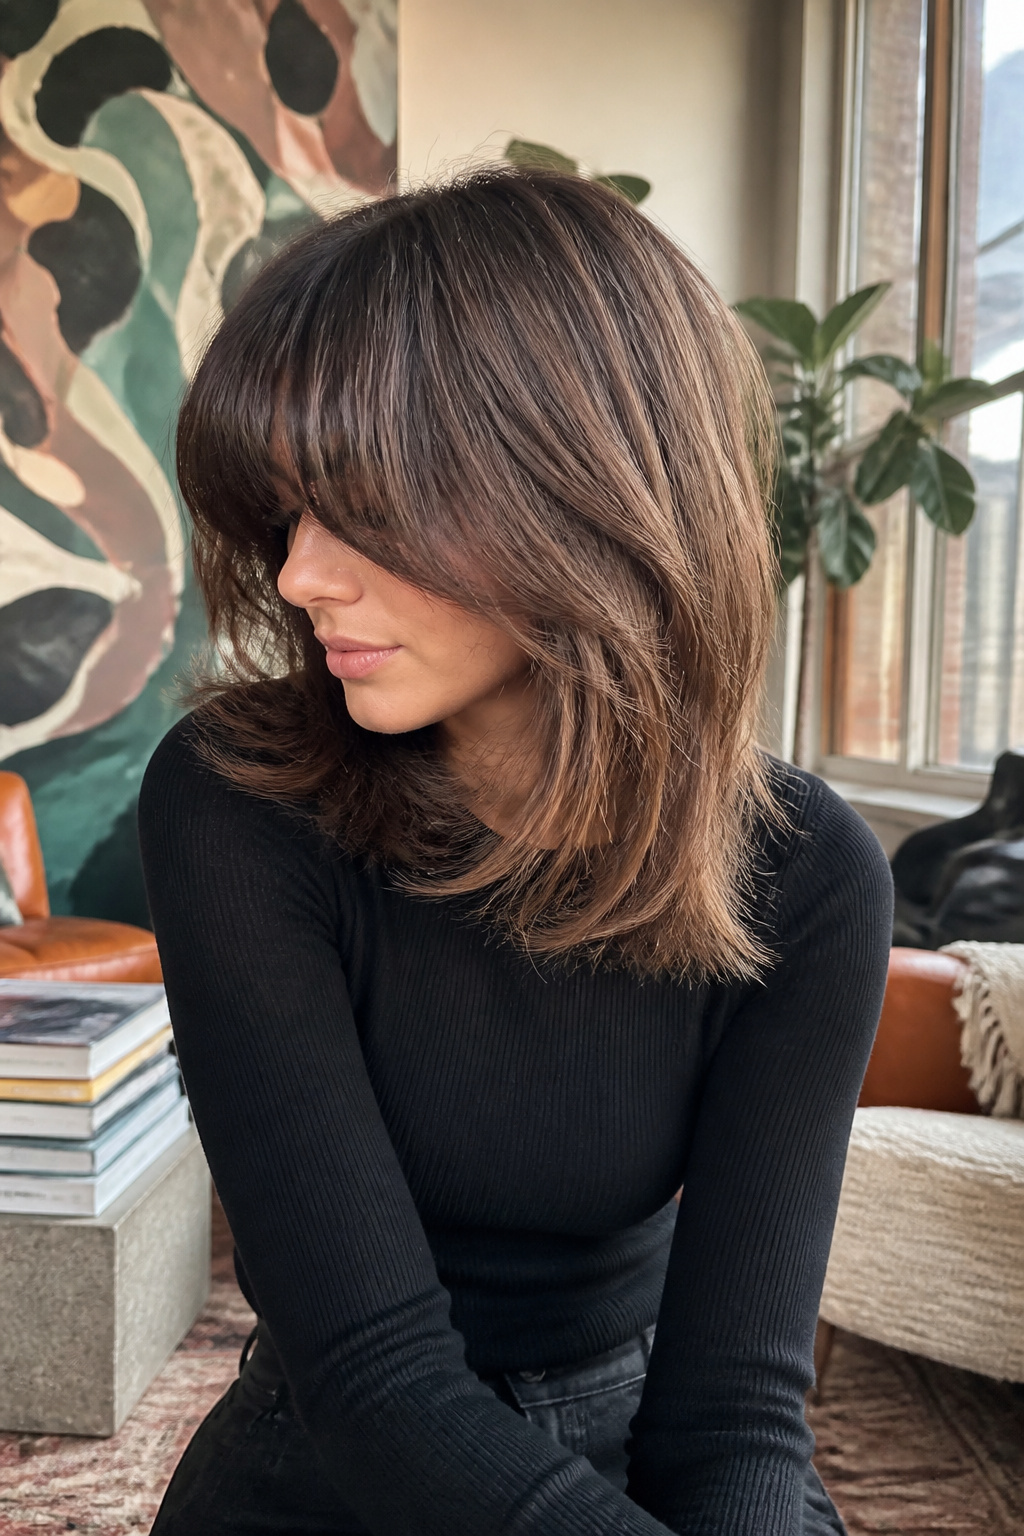
The full, sexy bang Brigitte Bardot wore through the 1960s still reads as the statement piece in any layered cut. Paired with voluminous layers round-brushed into a bouncy coif, these thick Bardot bangs are the star, not an accent, and the framing layers exist mainly to support that voluptuous silhouette. The look works as well in a signature Bardot bun as it does left loose and slightly undone, but the maintenance is real: of every bang style on this list, these require the most upkeep. The density means regular trims to keep the line from going heavy, plus daily styling with a round brush or large-barrel iron to keep the shape from collapsing into a curtain rather than a frame. A solid black color pushes the whole thing toward rocker-chic territory, though the cut itself reads softer in natural tones. The half-century test matters here; what convinced me, paging through decades of references, is that the silhouette has held because the proportions are genuinely flattering rather than merely nostalgic.
38. Sombre Hair with Light Bangs

The sombre technique keeps the color melt so gradual that the line between natural base and lighter ends almost disappears. Where ombre can look like two distinct shades stacked, sombre reads as one tone that simply got sunnier toward the bottom. The bangs in this version are lifted to match that mid-length lightness rather than staying at the root color, which changes how the face is framed.
That lightening on the bangs sits closer to the skin and picks up every shift in undertone. Plan on toning every four to six weeks if your water runs hard or you heat-style regularly; the smaller surface area of bangs turns brassy faster than the lengths do because they are washed more often and absorb more product residue. A violet conditioner left on for two minutes in the shower buys time between salon visits, but it will not replace a proper glaze once the orange starts creeping through.
The cut itself works best with layering that breaks up the density right at the cheekbone, letting the lighter bangs blend into face-framing pieces rather than hanging as a solid curtain. Ask your stylist to keep the ends of the bangs feathered; blunt lightened tips can look like a stripe against darker roots when the tone shifts.
39. Ombre Hairstyle with Bangs

An ombre with layered bangs demands a steeper color jump than sombre, and the bangs themselves become a decision point. Keeping them dark against a lightening mid-length roots the face and keeps the contrast architectural; lightening the bangs to join the gradient softens the line but risks a grow-out that stares back from the mirror every two weeks. The layers are what sell the color story, each one peeling back to expose another tone, though that same exposure means the demarcation line has nowhere to hide. Longer ombre can blur a root with distance and movement. Bangs sit still, front and center, and the band of natural color widening at the hairline becomes the first thing noticed. Budget for toning glosses between the bigger appointments, or plan the shift so the bangs stay in the deeper range where regrowth behaves itself.
40. Style with Thick Choppy Bangs

Thick choppy bangs sit somewhere between a blunt fringe and a shattered shag cut, and that middle ground is where most of the attitude lives. The weight stays substantial across the forehead, which keeps the style from going wispy by noon, while the irregular, hand-cut edges break up what would otherwise be a heavy curtain. I have watched stylists chip into the ends with a razor after the initial cut, and the difference is immediate: movement without collapse.
The texture works best when there is bone structure to carry it. Strong brows, a defined jaw, or prominent cheekbones give the chop something to frame. Small or delicate features tend to get overwhelmed by the visual mass, and the irregular edges can make a narrow face look pinched rather than editorial. If your bone structure is softer, the same thickness with cleaner, more predictable ends usually reads better.
Styling is minimal but specific. A round brush and a concentrator nozzle lift the roots so the bangs do not plaster flat; a dab of dry paste at the ends emphasizes the piecey separation. Skip shine serums here, they turn the deliberate roughness into accidental frizz.
Frequently Asked Questions
How do I get layered hair with curtain bangs?
Ask your stylist to cut the hair at different lengths so the layers stack on top of each other, and to shape the curtain bangs at an angle from the middle parting rather than straight across. The angled sectioning lets the fringe move properly, falling forward for coverage or blending back when pushed aside. A professional cut matters here because the sectioning needs to be precise for the two elements to work together.
How long does it take for bangs to grow out?
Hair grows about a half inch every month, so the timeline depends on how short you start and how long you need them to reach. Shorter bangs take longer to catch up to the rest of your hair, while peekaboo-length bangs sidestep the awkward grow-out phase entirely. Using a scalp serum and massaging it in can help minimize breakage during the process.
Do layered bangs make your forehead look smaller?
Yes, layered bangs are one of the most effective ways to visually reduce forehead size. A side-swept frame fringe that leaves just a portion of forehead visible breaks up the area so it reads smaller than it actually is. The key is keeping the bangs soft and blended into face-framing layers rather than cutting them as a solid blunt block.