
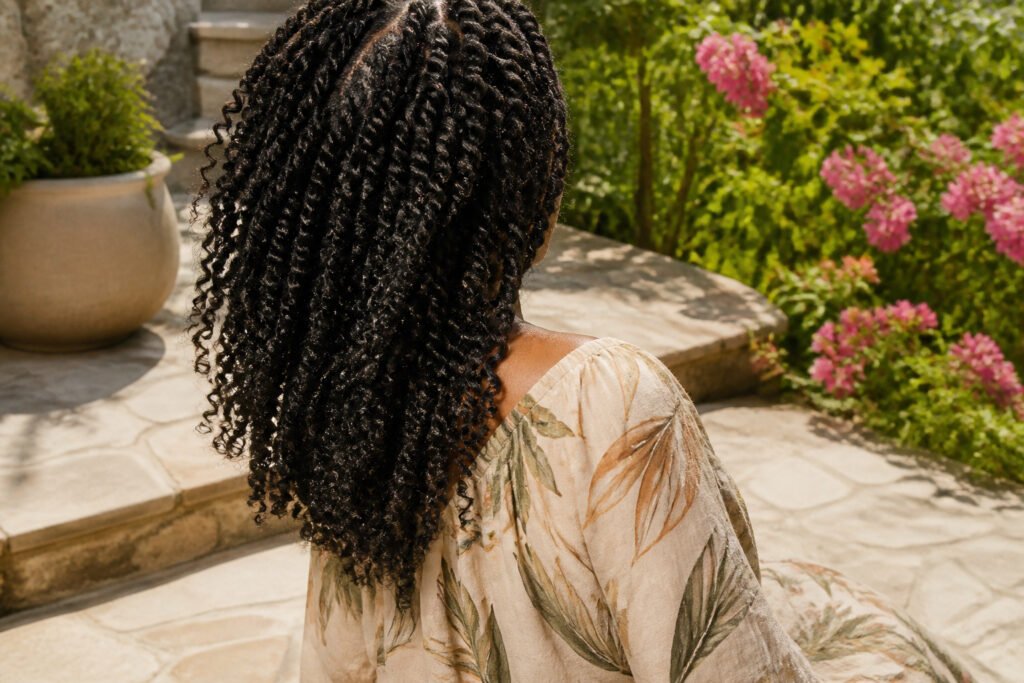
Spring twists are a lightweight protective hairstyle built from tightly coiled hair extensions that bounce back when tugged. The six- to eight-hour install rewards you with three to eight weeks of wear, but the style turns on one detail: twisting the extension in the direction its coil naturally wants to go. Get that wrong and the twists unravel within days.
What Spring Twists Actually Are

Spring twists are a lightweight protective hairstyle built from tightly coiled hair extensions. The style gets its name from the bouncy, spiral-like curls that spring back when tugged, a texture created by using tightly curled braiding hair rather than straight or kinky extension hair. Where Senegalese twists hold a smooth, rope-like definition and Marley twists carry a rougher, more deliberate texture, spring twists sit softer and more natural against the head, with less weight and less uniformity in the finished look.
The install takes time, typically six to eight hours, but the payoff is wear time. Depending on how you care for them and your natural hair texture, spring twists last anywhere from three weeks up to two months, with some wearers stretching closer to eight to ten weeks before takedown.
1. Preparing Your Hair

Clean, stretched hair makes the difference between spring twists that last and ones that tangle by week two. I start with a clarifying wash, then follow with a heavy conditioner because the extensions will hide the scalp for weeks and this is the last chance to get moisture underneath. The detangling stage is where most people rush: working in four to six sections with a wide-tooth comb, I start at the ends and move up, not down, because pulling from the root just packs shed hair toward the middle and creates the exact knots that make installation miserable. Trim split ends before you twist, not after. Damaged ends continue splitting upward inside the extension, and by the time you take the style down, you have more breakage than you started with. A rat-tail comb helps section cleanly, and a little leave-in conditioner or hair cream at the roots keeps the base pliable while you work.
2. Installing the Spring Twist Hair

Working in clean, dry sections keeps the base tidy from the first braid to the last. I braid my natural hair about an inch down from the scalp, just enough to anchor the extension without building bulk that shows through the twist. A crochet hook pulls two to four pieces of spring twist hair through that braid; fewer pieces for a finer twist, more for fullness that still moves. The trick is checking which way the extension naturally twists before wrapping it around the braid base a few times, then twisting down to the ends in that same direction. The full install runs six to eight hours, so I clear a weekend afternoon and queue up something long to watch. Most heads need three to six packs of hair, and buying the sixth pack beats running short with two rows left at the crown.
3. Styling and Maintenance

A lightweight leave-in conditioner keeps spring twist hair from drying out after the first week, when the extensions start pulling moisture from your own strands. I work it through the length of the twists, not the scalp, since the braiding hair itself needs the hydration more than the roots do. For edges, a small amount of gel pressed in with a soft brush gives a polished finish that lasts through humidity without flaking.
The scalp needs its own routine. A few drops of lightweight oil massaged along the part lines prevents the itch and tightness that makes people take these out early. When washing, a gentle shampoo cleanses without stripping; I focus on the scalp and let the runoff carry down the twists rather than scrubbing the length. Sleeping with a silk scarf or bonnet is what actually preserves the style, since friction against cotton roughens the curl pattern overnight and turns the ends frizzy in about three days. The bonnet stays put better if the elastic sits at your hairline, not your forehead.
4. Nighttime Care

Friction is what turns neat spring twist hair into a frizzy halo by morning. A silk or satin scarf wrapped snugly around the twists before bed keeps the strands from rubbing against cotton sheets, which wick away moisture and rough up the cuticle. The wrap should sit low enough to cover the nape but not so tight that it flattens the volume at the crown.
A satin pillowcase works if scarves tend to slip off during the night. The fabric matters more than the product: silk is a natural protein fiber with a smoother surface, while satin refers to the weave and is usually polyester. Both reduce drag enough to matter, though silk absorbs less of the scalp’s natural oils over time.
The first week I kept these in, I skipped both and woke to twists that looked two weeks older than they were. The difference was visible by day three once I started wrapping. For anyone who moves a lot in sleep, the scarf-and-pillowcase combo is the safer bet.
5. Removing the Twists

Spring twists can hold anywhere from three weeks to two months, depending on how well they were installed, your hair texture, and the care you put into maintenance. The real test comes when it is time to take them down, because rushing the removal undoes all of that careful prep work.
Unravel the twists in the reverse order they were installed, working from the last section you finished back toward the first. This keeps the hair from tangling on itself as the extensions come loose. I find it helps to apply a light oil or conditioner to each twist before you start pulling it apart, especially at the root where the extension hair meets your own. The slip prevents the kind of friction that leads to breakage and single-strand knots.
If a twist has started to mat near the base, do not force it. Saturate the area with more conditioner and let it sit for a few minutes, then work the shed hair free with your fingers before the comb ever touches it. Your fingers will tell you where the tangle actually is; a comb just rips through and guesses wrong.
6. Long Spring Twists

Long spring twists give the most room to move between looks. The extra length, usually falling past the shoulder or down the back, lets you sweep everything up into a high bun or let it hang loose for volume that shorter sets cannot match. 24 to 30 inches of extension hair is the common range for this style, though some go longer depending on how much weight their scalp tolerates.
The install still runs that standard 6 to 8 hours, same as any spring twist set, but the payoff shows in styling options. A ponytail, a twisted crown, or a simple half-up half-down all read differently when the twists have length to drape. Down styles show off the springy curl pattern best; the bounce stays visible rather than getting compressed against the neck.
Weight is the real limit here. The tightly coiled extensions are lightweight for what they are, but thirty inches of anything adds up. If your first set ever gave you a headache by day three, the length was probably the culprit, not the twist tension alone. Shorter long sets, around 20 to 24 inches, split the difference for anyone who wants versatility without the scalp fatigue.
7. Ombre Spring Twists

An ombre effect on spring twist hair works by concentrating the braiding hair color at the ends while keeping the roots closer to your natural shade. The transition zone sits somewhere in the middle third of the twist, and where exactly you place that line changes the whole look. A high transition starts the fade around ear level and reads as bold; a lower one, beginning near the shoulders, looks grown-out in the intentional way salon color does.
Honey blonde ombre against a dark base is the combination I see most often, and for good reason. The warm tone catches light without demanding the maintenance that all-over blonde would. For a subtler take, burgundy fading from near-black roots gives the same dimensional effect in office lighting but still shows its depth in sunlight.
The visual trick depends on how spring twists hang. Because each twist has its own spiral texture, the color shift breaks up along the curl pattern rather than cutting across in a straight line. That irregular edge keeps the ombre from looking like a dipped end, which is what happens when the color change is too sharp or placed too low. Keep the transition zone within the middle third, not the bottom two inches, or you lose the gradient entirely and end up with two-tone hair instead.
8. Spring Twists Bob

A spring twists bob lands somewhere between chin and collarbone, short enough to keep the weight off your neck but long enough that the twists still swing when you turn your head. The shape matters more than the length, though. The best versions taper slightly through the back so the twists curve under and frame the jawline instead of splaying outward at the ends.
What I noticed looking through installations that worked: the twists need to sit close to the scalp through the crown and only begin to relax their hold around ear level. That tension at the top gives the bob its clean silhouette. Without it, the style collapses into a generic short twist that reads messy rather than intentional.
For neck comfort, the nape should clear the skin by at least an inch. Twists resting directly on the neck warm up fast in spring weather and tangle at the collar. A stylist can angle the back row upward slightly, or you can pin the bottom layer when the day turns hot.
The framing is the payoff. Twists cut to hit the cheekbone on one side and skim the jaw on the other create an asymmetry that works on rounder faces. Both sides even and blunt suits longer faces better. Ask for the part placement before the install starts; moving it later disturbs the tension you need for the shape to hold.
9. Small Spring Twists

Smaller twists change the whole feel of the style. The finer diameter sits closer to the scalp and reads as a more delicate version of the standard look, almost like a dense braid-out rather than a protective style with obvious parting. That fineness comes at a cost in time. Each section takes the same anchoring and twisting motion, but there are simply more of them, and the thinner strands tangle more easily if you rush the separation. Plan for roughly double the install session you’d need for medium-width twists, and protect your shoulders with a good chair because the posture strain sneaks up around hour three.
The finished density is the payoff that keeps people coming back despite the labor. The twists pack together with barely visible scalp between them, giving a fullness that heavier twists only achieve with added volume at the ends. The movement is different too: these sway and separate like natural hair in a way that chunkier twists can’t quite manage. For anyone whose goal is a style that reads as grown-out texture rather than a clear protective install, the extra hours make sense.
10. Multicoloured Spring Twists

Bold color placement turns spring twist hair into a deliberate statement rather than an afterthought. Chunky black and blonde twists give a highlighted effect that reads from a distance, while scattering just a few bright accent twists through natural black keeps the look wearable for everyday. The 99J burgundy option works as a half-up style that frames the face without overwhelming it.
Purple-red and honey-blonde ombre placements offer two different ways to wear the same idea: one keeps the drama concentrated, the other lets it drift downward. Two buns with blonde twists add shape and height that a single color rarely achieves on its own. The mix-and-match approach matters more than the specific shade; spring twist hair comes in enough colors to design around your own wardrobe rather than chasing a trend.
11. Half Cornrow Half Spring Twists

A half cornrow half spring twist style splits the head into two distinct zones. The front and crown are braided down in cornrows, usually running straight back or fanning from a side part, while the remaining hair at the back and nape is left loose for medium-size spring twists. The cornrows carry most of the structural work, keeping hair flat and controlled around the face, and the twists add volume and movement where it shows from behind.
The sectioning matters more than the braid pattern itself. Cornrows that stop too far back leave an awkward gap where the twists start; cornrows brought too low compete with the twist density and the silhouette turns bulky. A clean part, ear to ear or slightly above, gives the neatest transition. The twists themselves read as fuller against the flat braids, so medium size works better than small here, tight enough to hold shape but still soft. The result reads as two deliberate textures rather than a style that could not decide what it wanted to be.
12. Spring Twists with Coloured Ends

Dip-dyeing the ends of spring twist hair gives you the color payoff without committing your whole head to maintenance. The effect sits only on the last two to four inches of each twist, so the grow-out line is abrupt by design, not a root problem you chase every six weeks. That makes it a practical middle ground between solid color and a full ombre that fades through a longer stretch of the strand.
Honey blonde is the shade that keeps showing up on this look, though burgundy and purple-red are common choices if you want something cooler against darker base twists. The technique differs from ombre in one clear way: ombre on spring twists usually carries the lighter color up a third or half of the length, while dip-dye keeps it strictly at the tips. Less blending work during install, less weight from added hair higher up where the twists start, and the color reads as an accent rather than a gradient.
You buy the braiding hair already two-toned or dip the finished twists yourself in hot water with dye. The pre-colored packs save time; the DIY route lets you match the exact tone to something you already own. Either way, the colored ends catch light differently than a full-head job, and the contrast against dark roots stays crisp for the full six to eight weeks you wear the style.
Spring Twists vs Passion Twists

Spring twists and passion twists look nearly identical once installed, but the differences matter once you are wearing them. Spring twists are lighter, which means less tension at the roots and less scalp fatigue by the end of the day. The weight gap comes down to technique and fiber: spring twists use less braiding hair overall, and they rely on tightly coiled extensions rather than the water wave hair that passion twists require. That coiled fiber is also what gives spring twists their bounce; tug one and it springs back, where passion twists hang with a looser, more relaxed curl at the ends.
| Attribute | Spring Twists | Passion Twists |
|---|---|---|
| Weight | Lighter, less tension on scalp | Heavier |
| Extension texture | Tightly coiled / springy | Water wave / curly |
| Diameter | Generally smaller | Generally larger |
| End behavior | Bouncy, springs back | Looser, more relaxed hang |
The smaller diameter of spring twists makes them read as tighter and more uniform, closer to a traditional twist set. Passion twists run larger and can look like a hybrid between box braids and twists, which some people prefer for volume. Neither is the wrong choice, but if your scalp is sensitive or you plan to keep the style for the full eight to ten weeks spring twists can last, the lighter weight wins.
How I Keep Mine Looking Fresh

Spring twists start looking tired around week two when the scalp gets dry and the ends fuzz out. I learned to catch it earlier. A lightweight oil on the scalp every three days keeps the itch away and the roots neat; I use just enough to coat my fingertips, not enough to travel down the twist and attract lint. For washing, a gentle shampoo worked through the scalp only, letting the rinse carry the suds down the length, saves the twist pattern from swelling into a frizz cloud. The real difference came from sleeping with a silk scarf tied over a bonnet rather than choosing one or the other. The bonnet alone slipped off; the scarf alone flattened the top. Together they keep the twists springy for a solid six weeks, which is about as long as my patience for any protective style lasts.
What Went Wrong My First Time

The six-hour mark hit around hour three, and my arms were still above my head. Tension at the root is what separates a style that lasts from one that costs you edges. I pulled too hard on those first rows, thinking tight meant neat, and spent the next week with a headache that ibuprofen couldn’t touch. The twist itself felt simple enough: braid down an inch, wrap the spring twist hair, keep the direction consistent. But three packs in, I realized the coils I’d separated were uneven, which meant some twists hung thick and others looked stringy against my jawline. Moisture was the other blind spot. I loaded leave-in on the surface of the twists instead of working cream to my actual roots, so my scalp flaked while the extensions stayed glossy. The style still lasted, but barely: three weeks before the frizz won out, when two months is the range you are aiming for with solid prep and nightly satin.
Frequently Asked Questions
What are spring twists?
Spring twists are a lightweight protective hairstyle built from tightly coiled hair extensions that bounce back when tugged, giving them their signature spiral curls. They sit softer and more natural against the head than Senegalese or Marley twists, with less weight and a less uniform finished look. The style works well on natural hair and can be customized by choosing different lengths and colors of braiding hair.
How long do spring twists last?
Spring twists last anywhere from three weeks up to two months, with some wearers stretching closer to eight to ten weeks before takedown. How long they hold depends on your installation quality, your natural hair texture, and how consistently you maintain them. Moisturizing your scalp and twists regularly, sleeping with a silk scarf or bonnet, and keeping tension low at the roots all help push wear time toward the longer end of that range.
How do you install spring twists?
Start by braiding your natural hair about an inch down from the scalp, then use a crochet hook to pull two to four pieces of spring twist hair through that braid base. Check which way the extension naturally twists before wrapping it around and twisting down to the ends in that same direction. The full install runs six to eight hours and typically needs three to six packs of hair, depending on how full you want the finished style to be.